Sunday, October 2, 2011

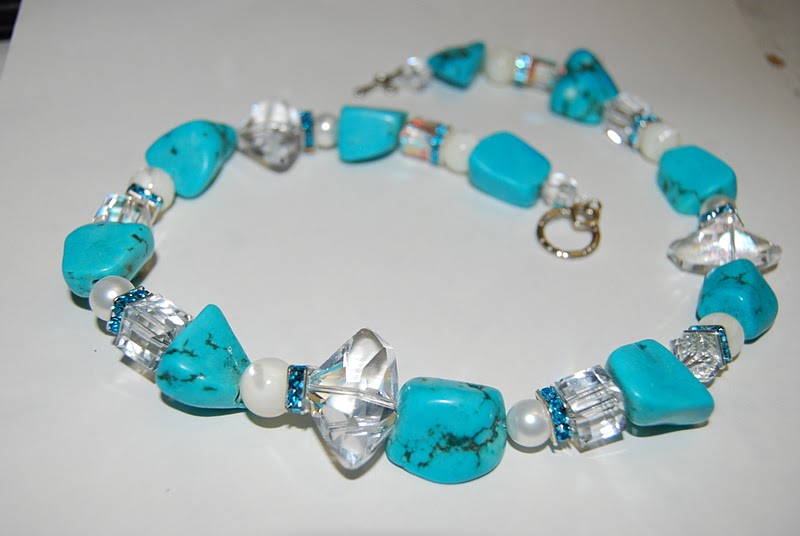
Turqoise

I love turqoise!
I remember loving it as a kid and my Dad brought me home a ring that had some turqoise in it, I think..
I just love the color and how the stones are all unique :)
I paired them with swarovski clear crystals, off white glass beads, and white pearl beads, with blue swarovski square spacers.

This necklace I made to go with an orange dress I bought.. that I've been looking for a good turqoise necklace to go with it, but couldn't find one I liked.. so I got some beads and made one myself.

Monday, September 26, 2011

fabric flower necklace


These were fun to make and fairly quick!
I got to make these for my Activity Days girls as a goodbye gift.. that I will no longer be working with since I am now going to be working with the Beehives in Young Women!

all you need is some scrap fabric, ribbon, glue (I used hot glue), felt, 2 hands with fingers, and embellishments (opt.. I used plastic pearl beads)

cut strips into 1"x24" or so.. the length depends on how big you want the rose..different sizes are nice.

fold your strip in half and place a strip of glue about 2 in from the top, down and start rolling the strip down. (this is your center part of the rose)

Now.. continue rolling your strip around and around.. twist the fabric as often as you like and I like to keep the strip upright to keep the flower flat, once it starts to get bigger.
place glue as your twisting and wrapping every now and then to keep it all together.

(if you have only a small strip, and you want to have a bigger flower.. when you get to the end, tuck the end of the strip and glue it to the back of the rose and from there start with another strip by gluing it to the back and continue rolling it around the previous made rose)


Once the rose is complete and you've glued the end piece to the back.
cut out a piece of felt in a circle the size of the rose on the back and glue half of it on.. so you can slide your ribbon in, before gluing the whole thing down.

I cut about 32" of ribbon and glued the middle part under the felt piece on the back of the rose and glued the other half of the felt down.
place your other roses on the sides.. and depending on how you want them place and make sure you glue the sides of the roses together as well.
The ones that are stacked closer together.. I also glued a piece of small ribbon on the back across the top 2 roses to keep them together more securely

Once all your ribbon is glued under the felt pieces and roses glued together the way you want them placed.. add your emellishments. glue them on and you are done!

which one do you like best and why?

Now I need to make some for my own girls :)

Paper Organizer

I found this idea from Pinterest..
 although I didn't use shipping boxes as suggested, because I didn't feel like going out and buying shipping boxes.. but if you have them on hand, I say that is a wise choice.

This took some time.. because it is more made from scrap cardboard, from leftover boxes from bunk beds.

 I cut up the boxes into the size cardboard I wanted and used hot glue and duct tape to piece it all together and then covered it all in scrapbook paper.

Now I store my scrapbook paper in it!

Wednesday, September 7, 2011

mini scrapbook

We made these for activity days and it was so fun!

you need:
5 brown paper bags (we used the small skinny ones)
metal binding clip to attach all the bags together
ribbon
scrapbook paper
glue

put your bags together in whatever arrangement you want.. this one is staggered.
attach the clip to keep the book together
start with a strip of scrapbook paper, precut, on the outside page and glue (I used spray adhesive)
overlap around the edges of the bags and when it ends overlap more paper and keep going until it is all covered!

next stop.. embellish with ribbon around the middle and curl w/ your scissors.

last, but not least.. embellish more with cute letters, stickers, etc.. use as a photo book or whatever you want! endless possibilities :)

Wednesday, August 24, 2011

Dish Towels & flashcards

Appliqued dish towels

Made these for a good friend's birthday
The brown and turqoise polka dot fabric worked out perfect for the eyes of the birds!

(The appliqued patterns are hand drawn on the fabric and cut out)


Phonogram flashcards
index cards
small book ring
ribbon
1 hole punch

easy peasy

Friday, August 12, 2011

bracelet

I made this bracelet for my sis in law for her birthday!
it's so much more fun giving something to someone that you made, rather than bought at a store.

you need:
beads, clamper beads, toggle, clear wire

start by threading your wire through a clamper bead then through one toggle piece and back through the clamper bead. make sure the clamper bead is pulled tight up against the toggle and crimp the bead with your crimper (looks like little pliers)

bead your bracelet however you like.. I did a random pattern

then repeat the other end with a crimper bead and cut any excess wire (string down one of the beads so it doesn't poke out)


Wednesday, August 3, 2011

Toy Car Holder

Is it safe to say that most boys love cars.. ok, then check this out!

now your boy can take his cars with him wherever he goes!

simple to make and made it during nap time :)


rolled up with elastic
materials:
cut piece for back : 8.5" x 16.5"
cut piece for "garage" slots: 4.5" x 16.5"
cut piece for street: 8.5" x 16.5"
bias tape
1/4"-1/2" elastic
yellow felt

first:
sew on your pieces of yellow felt strips; I made 6 whatever size you want and measure them evenly across the middle of the top part, which will be your street:)
account for 1/4"-1/2" seam on each side.

I did a zig zag stitch around each small rectangle

second:
sew on your bias tape to the top of the "checkered" fabric

third:
sew the "checkered" fabric to the black fabric, under the yellow strips.
make each slot 2" apart (you will be able to fit 8 cars)

fourth:
now sew the two large pieces together; right sides together along 3 edges; leaving the small side edge open. Reverse the fabric right side out.
tuck in the raw edges and sew the final edge with your elastic folded in half (measure by wrapping around so you have a nice snug when you close it up). Then, sew along the entire circumfrence.

fifth:
slide in some cars and you are done!