Sunday, June 20, 2010
Mom & Me
Nursing Cover
Thursday, May 13, 2010
Baby Boy!
Saturday, April 3, 2010
Easter Bags!
1. Cut a 17-by-10-inch piece of felt for the body of the bag. For added decoration, use pinking shears.
2. Cut two 1-by-10-inch strips of felt to reinforce the inside top of the bag. Cut four 1-by-12-inch strips of felt for the handles.
3. Pin together two handle strips, and sew along each long side, close to the edge. Repeat for the second handle.
4. Pin the ends of the handles onto what will be the inside top of the bag (the short ends), 2 1/2 inches in from each side. Pin the 1-by-10-inch strips of felt over the handles, aligning them with the bag's top edges.
5. Sew along each edge of the reinforcement strips, securing the handles as you go.
6. To create the bottom of the bag, fold it in half, wrong sides together, and pin at both bottom corners, 1 inch up from the fold. Fold the bag back, right sides together, and pin along the sides, keeping corner folds in tact. Sew along the sides, 1/8 inch from the edge.
7. Press the bottom side edges of the bag to form a flat bottom. Press the side seams. If desired, punch holes into handles and along the bag's top edges
*I used contrasting yellow strips for the inside of the handles and for the embellishments.. the flowers were hand sewn with a button and I also added a little hot glue.
*The letters were glued on and I used a zig zag stitch around the edges
*The ribbon is hot glued around the seam at the top
Saturday, March 13, 2010
Project Display Board
I bought the jumbo clothespins at Hobby Lobby. I copied some other fabrics by Tina Givens that coordinated with the other fabric and printed them off the computer (with the help of photoshop) onto white cardstock. I then glued them on with modge podge and used it on top as well.
Then, embellished them with buttons and ribbon and used hot glue to glue them to the board.
Now my girls will have a stylish board to display their beautiful artwork and school work!
Tuesday, February 23, 2010
Dolls and Blankets
This blanket is also for my neice's birthday! it's a 34"x42" with a 2" satin ruffle trim. Minky swirl and cotton. I prewashed the cotton side before I sewed on the minky side...I think this is a good idea, so that the different type of fabrics can be even when made and washed again.
Monday, February 1, 2010
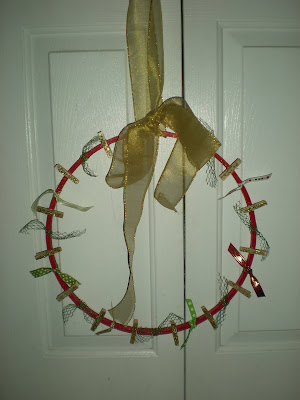
Christmas Card Wreath
 You need: 14" embroidery hoop: paint it any color you like or wrap with ribbon with glue.
 small clothespins about 3" apart, glue with hot glue. (I alternated the pins facing different directions, but you can have them all going the same way)
4" ribbon tied between each clothespins
Large ribbon for hanging
Next, pin your Christmas cards onto the clothespins!
Puffy Heart Pendant, Window Seat Cover

 Fuschia & Pink swarovski puffy heart
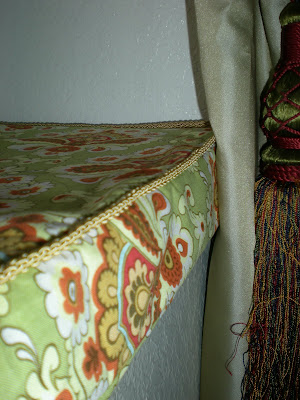
 I decided my window cill needed a padded cusion bench seat. So I measure it and got working. I bought 2 in thick foam for the seating. I used Amy Butler print fabric and decorative cord for the edge. I also plan on putting a piece of batting on the top for extra cushion. If you are interested in making one and don't know how, contact me :)
 There is a free tutorial for the Puffy Heart Pendant! visit http://www.mydailybead.blogspot.com/
 Saturday, January 23, 2010
Valentines Wreath
 I have never decorated for Valentines Day before.. and thought I'd do at least a wreath to celebrate the Love month..haha
Things you need:
about a 10" styrofoam circle form, Ribbon, dried flowers, hot glue, scissors, large paper clip, utility knife, sand paper block, pliers.
This wreath is also found on Martha Stewart, but I did it a little different.
I started out by making a pattern heart from paper to make sure I get an even shaped heart and traced it onto the styrofoam. Then, cut the styrofoam with a large razor blade or something sharp along the lines. Next, angle the blade along the edges to make a beveled edge so you can make a more demensional shaped heart with your flowers wrapping around the edge. Sand the edges to make smooth corners and an even shaped heart.
Stretch out a large paper clip and make a cook the width of whatever size ribbon you use to hang. Make sort of a squared U shape and stick the 2 ends of the paper clip into the form and bed the ends back into the form out the other side with pliers. Glue where the paper clip is instered and comes out on both sides with hot glue to secure it.
Cut off the stems of the slowers to about 1/4" or so there's enough area to glue the flower to the form. Start in one section and work your way around the heart: make sure the edges look even all the way around. I used cockscomb dried flowers here :) (They are hard to find.. ordered them online).
Hang with your favorite matching ribbon and you are ready for Valentines Day!
Thursday, January 21, 2010
Grocery bag holder

2 pieces of narrow elastic (1/2", 1/4" wide or smaller). 11 " and 6 1/2 ".
1 piece of ribbon - 14 inches long.
Thread
If you're using strips, sew all of them together along their long sides (a little larger seems than your elastic). Iron all of the seams open.
Then, make a casing for your elastic at each end. Turn over the fabric about 1/4" and then fold it over again a little larger than the size of your elastic. Sew really close to the fold so that your elastic can still fit. Do this to both ends.
Now, thread your elastic through each end and sew each end of the elastic securely to the opening of each end of the casing. Keep in mind, the larger piece of elastic is for the top of your holder (so you can shove many bags in) and the smaller piece of elastic is for the bottom (so that you only pull one bag out at a time).
Next, turn the holder right side out and pin the ribbon (I turned the end under once) into place, about 3/4 of an inch from the top. Sew the ribbon into place several times, making it secure.
Lastly, sew the 2 long sides together, with right sides together and sew other side of ribbon to other side of bag.
Stuff it and Hang it!


